Creating a Digital Product
Follow the below steps to create a new digital product:
-
In the Products module’s All Products tab, select a digital product template from the New Product drop-down. By default, Digital appears, but you can ask Operative support to create additional templates or rename this template as needed..
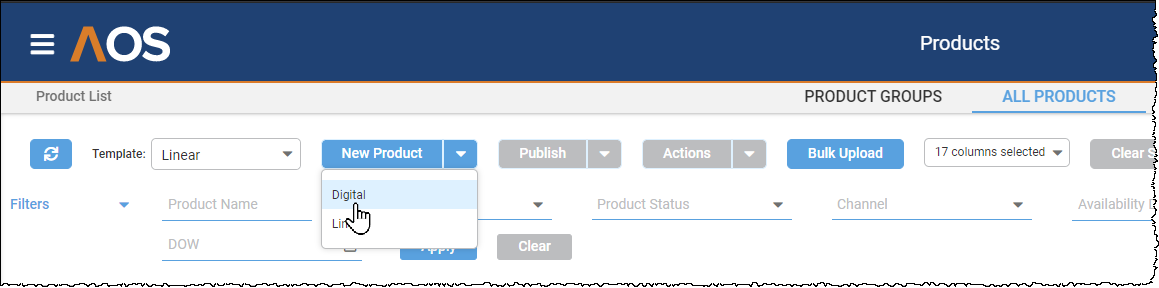
The Add Product page opens:
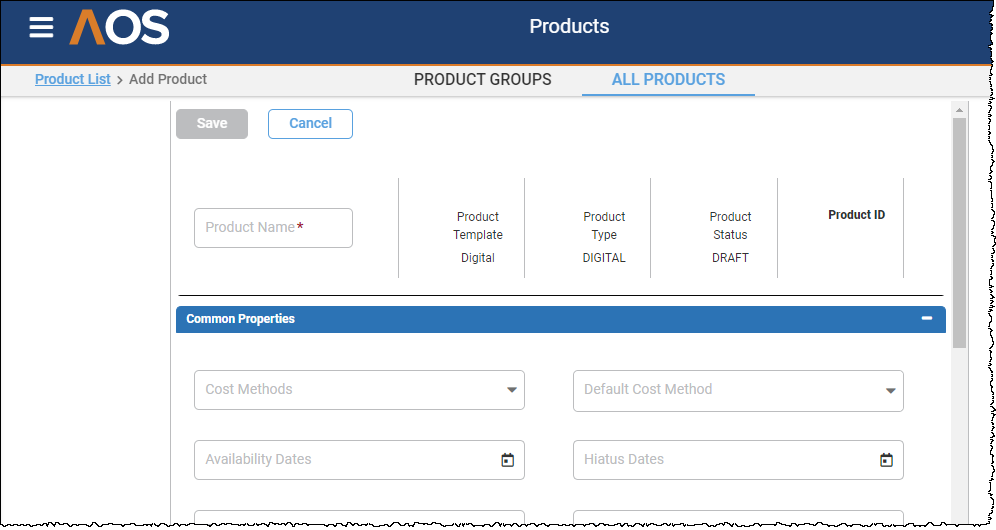
Be aware that the fields, their names, and their positions on the page can be customized on request, so this documentation may vary from the exact fields you see on the screen. Operative does not recommend significant customization as this may cause delays and confusion when contacting Operative support . However, Operative support can work with your company to add custom fields, hide fields you do not use, or change which fields are mandatory.
-
Enter the product's name.
-
In the Common Properties panel provide the requested information, as described in the following table.
Items on the screen marked with a red asterisk (*) are required.
Item Description Production System
This sets an external system, typically an Ad Server, like Google Ad Manager or FreeWheel. Production Systems are defined in the System Configuration module under System > External System, where the Integration Type must be set to Primary to appear within a Digital Product.
While you can create a product without a Production System, it will not generate lines in Ad Operations Orders or any external systems. If desired, you can ask Operative support to make Production System a required field.
Forecast System
This is the source when inventory forecast requests are made for the product. These requests are typically made in the Sales module where an external system is asked to estimate how many impressions will be available for a line item using the product.
You can set this field to Direct to PS if the inventory requests should come from the Production System itself (for example, FreeWheel will predict its own inventory).
To use inventory forecasts from a separate inventory system, specify that External System here. The External System and its connection details are defined in the System Configuration module under System > External System, where the Integration Type must be set on Inventory to appear within a Digital Product .
This filed is automatically filled in when you select a Production System that has a Default Forecast System set in the System Configuration module. You can then change this value as you wish.
Availability Dates
This optionally restricts the dates of the sales line items created based on this product. When the product is used within a package, these values are ignored. If you do not plan to use dates on digital products, you can ask Operative to remove the date fields.
Note: Dates on products within Operative.One were different and controlled on what date a product was shown in Sales and did not validate line item dates. In AOS, product dates restrict line item dates.
Hiatus Dates This is reserved for future functionality where it is expected to be merged with either split or blackout functionality. If you do not plan to use dates on digital products, you can ask Operative to remove the date fields. Rank This specifies the product's position in the product Rank sort order. It is used when you choose to sort a grid of products by Rank instead of alphabetically by name or by another product attribute displayed in that grid.
Plan Class This enables you to define which plans can sell this product. For example, if a product's Plan Class is set to DR, then only DR plans can sell that product.
Add Description
This is the product’s description.
Group Only
If this is selected, the product will be available for sale only as a child product within a group product.
Can Invoice
Show in Export
If the flag is set to true, Common Properties related information will be available in the export output file.
Can Produce
Has Performance
-
In the Classifications panel provide the requested information, as described in the following table.
Note: You can ask Operative to remove any of these fields that you do not plan to use.
Item Description Available Booking Types
This is reserved for future functionality where it will be used with some inventory forecast systems to set the priority of an ad related to other ads. It is currently a required field for digital products, but Operative plans to make it optional and when that happens if you do not plan to use Booking Types, you can ask Operative support to remove it.
Default Booking Type When Available Booking Types are set, this determines which of them is the default for line items using the product. This is required if Available Booking Types are set and must be one of the selected Booking Types. When there is only one Available Booking Type, it is set to default automatically.
Tags Tags categorize products and the available tags depend on how your organization decides to organize your catalog. You can assign one or more tags to a product for reporting and filtering. Tags are managed within the System Configuration module under Product and shared across Digital and Linear products. Product Category
Product Categories organize products. The categories you can choose from depend on how your company decides to organize your catalog. You can assign one or more product categories for reporting and for filtering. Product categories are managed within the System Configuration module under Product and shared across Digital and Linear products.
Genres
You can assign one or more programming genres for reporting and for filtering. Genres are managed within the System Configuration module under Product and shared across Digital and Linear products.
Creative Specifications
Creative specifications typically describe the type of creative asset served for the ad. However, no validations or controls are in place to ensure those descriptions are met. You can assign one Creative Specification for reporting and filtering. Creative Specifications are managed within the System Configuration module under Product, but specific to Digital products.
Forecast Category
Forecast Categories organize products, and can be linked to an external CRM or other system. AOS lets you have both
• Forecast Categories that are created and managed within AOS (native)
• Forecast Categories that are linked to a CRM system like SalesForce (SFDC).
All active Forecast Categories, those linked to a CRM system and those not, are available in the Forecast Category field.
You can assign one or more Forecast Categories for reporting and for filtering. They can be used for revenue aggregation across products with the same forecast category. Native Forecast Categories are managed within the System Configuration module under Product. By default they are only on Digital products, but Operative can add them to Linear products on request.
External Forecast Category
External Forecast Categories organize products, and are always linked to an external CRM or other system. They are the Forecast Categories that appear within the System Configuration under Product whose Native field is unchecked, indicating that they are managed externally from Operative.One in a CRM system. They are a sub-set of those available for the Forecast Category field.
Unit Lengths
Unit Lengths are typically used to set the length of a video ad. The system does not enforce this length, but it is useful for organization and pricing digital video products. A Unit Length is sometimes referred to as a Duration or Spot Length.
You can assign one or more unit lengths for reporting and for filtering. Unit lengths are managed within the System Configuration module under Sales and can be shared across Digital Products and Linear Sales lines. They may be extended to Digital Sales lines in a future release.
-
In the Cost Method panel, optionally set the Cost Methods you want available for the product in Sales.
At this time, if a product does not have any Cost Methods, then only the CPM cost method is available in the Sales module. If a product has cost methods defined here, then only those Cost Methods are available in the Sales module. The Cost Method set as the default is assigned to a line item when it is first created .
Click the Add Cost Method button to add a cost method. In the displayed pop-up, you can do the followings:
-
Select a Cost Method from the list.
-
Optionally, select a Buffer %. This sets the Production Buffer of a line item in Sales. The Production buffer is applied to the Quantity field (what you sold) to set the Production Quantity field (what you traffic). This increase accounts for third-party systems delivering less than primary systems or to meet a first party goal when trafficking a different unit than you sell. A Sales module user can override the Buffer you provide on the product. The product’s buffer only sets the line item Production Buffer on the initial creation of the line item.
-
To make the selected cost method the default applied cost method, select the Default check-box.
Finally, click Save to add the cost method, or click Save and Create Another to create a second one.
Be aware that one, and only one, Cost Method must be the Default. If you save a product without setting the Cost Method, the system selects a default one for you.
-
-
In the Targets panel, select a Targeting Template from the available value-list. This determines which targets a Sales user can set within the Sales module as well as any required Targets and default options..
-
Finally, click Save to create the digital product .
-
If the products closes, open it again.
-
Click Edit Targets to set the actual targeting.