Creating a Deal
You can create a new deal in two ways:
-
Create the deal from scratch and provide all of the necessary information.
-
Copy an existing deal that is similar to the new deal you want to create, and edit the copy.
To create a deal from scratch:
-
Create a new blank deal and define its basic parameters in the Header tab.
-
Add or exclude constraints and separation requirements, if necessary.
-
Build out the deal in the Workspace tab by adding products, adjusting pricing, scheduling impressions, and more.
-
Specify budget information in the Goals tab.
-
Adjust the deal's guaranteed impressions, CPM, or budget, if necessary, in the Goals tab.
-
Specify the deal's options, if it has any, in the Goals tab.
-
Change the deal's workflow status to reflect its current disposition.
Creating a Deal's Header
To create a new deal and fill in its header:
-
On the Sales module's Deal List page, click New Deal.
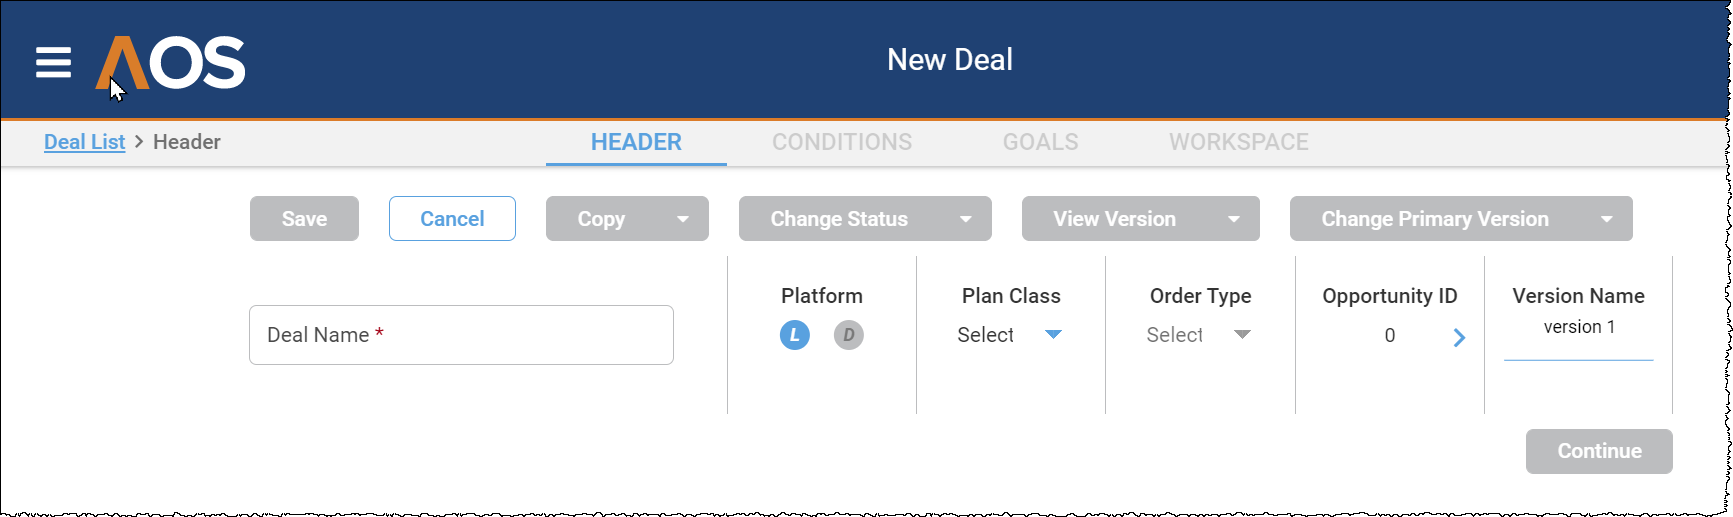
The New Deal page opens to the Header tab:
-
Provide the requested information, as described in the following table.
Items on the screen marked with a red asterisk (*) are required.
Item Description Deal Name
The deal's name, up to 30 characters long. Spaces, $ (dollar sign), and % (percent sign) are allowed. The name must be unique across all deals within your company's configuration of AOS.
Platform The advertising platform. You can select either or both:
-
Linear.
-
Digital.
If you select both Linear and Digital, AOS displays the Fluidity (F) toggle. If you enable Fluidity, AOS enables you to address under delivery on the linear platform with makegoods on the digital platform.
Plan Class If the Linear platform is selected, you can select a plan class.
Order Type If the Digital platform is selected, you can select the order type.
Opportunity ID This field enables you to integrate the AOS deal with other systems:
-
Opportunity ID links the deal to a Salesforce.com opportunity.
-
OnAir is an OnAir ID that links the linear AOS deal to an OnAir deal.
-
Operative.One is an order ID that links a digital deal to a sales order in Operative.One.
Version Name This enables you to define multiple versions of the deal. You can name the first version when you create the deal, and can define and name additional versions after the deal has been created. Each version name must be unique within that deal.
For example, if a client is considering $1,000,000 and $1,500,000 versions of the deal, you can specify a version name of $1M to identify that the version you are currently defining is the one for that amount.
-
-
After you have provided the requested information, click Continue.
AOS displays the General Details panel, and below it the panel or panels that correspond to the deal platforms you have chosen (Linear, Digital, or both).
-
In the General Details panel enter the requested information, as described in the following table.
Item Description Advertiser The name of the advertiser running the spot.
If AOS displays a warning icon for an advertiser, that indicates that the advertiser is in credit review. The credit review status is controlled by your billing team, and does not prevent you from creating a deal and moving it through the workflow to the Order status.
Click the kebab menu icon to the right of the field to display the Edit Advertiser panel, which enables you to view the following information:
-
Contact
-
Address
-
Category You can edit the category.
-
Secondary Category
-
Default Brand
Click Save after you have finished entering or editing values in the Edit Advertiser panel.
Buying Agency The name of the agency purchasing the deal on behalf of the advertiser. You can select only agencies that are linked to the deal's advertiser.
If AOS displays a warning icon for an advertiser or an agency, that indicates that the advertiser or agency is in credit review. The credit review status is controlled by your billing team, and does not prevent you from creating a deal and moving it through the workflow to the Order status.
Click the kebab menu icon to the right of the field to display the Edit Agency panel, which enables you to enter or edit the following information:
-
Commission
-
Agency
-
Role
-
Contact
-
Address
-
Start Date
-
End Date
You can enter this information for up to three agencies participating in the deal.
Click Save after you have finished entering or editing values in the Edit Agency panel.
Primary Account Executive The name of the primary account executive on this deal.
Click the kebab menu icon to the right of the field to display the Edit Account Executive panel, which enables you to enter or edit the following information:
-
Role
-
Name
-
Sales Team
-
Start Date
-
End Date
-
Split
-
Primary. If more than one role is listed in the grid, this indicates which one is the deal's primary account executive.
-
Delete. Click this if you want to remove this account executive from the deal.
Click Add Role if you want to add staff to the deal's team. For example, you can add additional account executives, and you can assign sales planners and sales assistants.
Click Save after you have finished entering or editing values in the Edit Account Executive panel.
Calendar The calendar enables you to control how quarters are defined for this deal. You can choose between Broadcast Calendar and your company's custom calendar.
Start Period Specifies the beginning of the period in which the deal will run.
End Period Specifies the end of the period in which the deal will run.
Deal Year
This is used for reporting, and controls which marketplaces are available to choose.
Marketplace
You can select:
-
Broadcast Upfront, which runs from the fourth calendar quarter of one year to the third calendar quarter of the following year.
-
Calendar Upfront, which runs from the first to the fourth calendar quarters of the same year.
-
Scatter, which are deals that are negotiated and closed at any time of the year, and are usually shorter flights.
Flight Date
Available flight dates are determined by the Start Period and End Period. You can select the beginning and end of the flight date by either:
-
Using the date picker at the right of the field.
-
Typing dates directly into the field.
Hiatus
This specifies any dates on which the ad must not appear. You can select individual days and date spans.
Deal Notes
You can enter any additional information you want to record about the deal in this field.
Time Zone
-
-
If you had selected Linear in the Platform field, AOS also displays the Linear Details panel. Enter the requested information, as described in the following table.
You can also watch a demonstration of how to specify this information in the Linear Details panel.
Item Description Channels The channels on which the spots will run.
If several channels are selected, you must specify one as the primary. In reports the primary channel assumes the deal's liability.
Which channels are chosen determines which ratecards and products are available for the deal.
Click the kebab menu icon to the right of the field to display the Channel panel, which enables you to enter or edit the following information:
-
Channel An individual channel.
-
HH Posting Methodology. The way in which the channel's estimated household impressions data, which it posts to advertisers and agencies, is calculated. It defaults to the methodology specified for the channel in Master Data Management.
-
DEMO Posting Methodology The way in which the channel's estimated demographic impressions data, which it posts to advertisers and agencies, is calculated. It defaults to the methodology specified for the channel in Master Data Management.
-
Primary. If this is selected, this channel is the primary channel.
Division Division is a category within channel, and allows for more reporting granularity, enabling your company to see where in each channel ad dollars are being spent.
Sub Division Subdivision is a category within Division, allowing for even more reporting granularity within Channel.
Primary Demo This is the deal's guaranteed demographic.
Click the kebab menu icon to the right of the field to display the Edit Demo panel.
In the Demo column, select all of the deal's demographics, and select Primary for the one that will be primary.
Your selections are displayed in the Selected column. You can remove any secondary demographic by clicking the X to its left.
Note that demos marked as Corporate are defined for the channel and cannot be removed from the deal.
When you are done, click Save.
Rating Stream The protocol being used to measure the demographic (for example, Live + 7). AOS offers multiple rating streams support.
Ratecard The name of a ratecard that will be applied to this deal.
The ratecard defines the pricing for the products sold in this deal.
Some kinds of deals require a ratecard. For example, a ratecard is required to price a national deal, and is optional when pricing a direct response deal.
You can select one ratecard in this field, and additional ratecards win the Edit Ratecard panel.
Click the kebab menu icon to the right of the field to display the Edit Ratecard panel. Click Add Ratecard. AOS displays a grid with the following columns:
-
Ratecard. Select all the ratecards that will apply to this deal. The Edit Ratecard panel will display a row for each selected ratecard.
-
Channel displays the channel associated with the selected ratecard.
-
As of Date. This instructs the ratecard to pull estimates as of this date, which enables you to create a deal using an earlier version of the ratecard.
This enables you to create a deal using an earlier version of the ratecard. For example, if you created a deal today, but would like estimates using a version of the ratecard from six months earlier, you can set As of Date to a date six months in the past, and AOS will use that earlier version of the ratecard.
-
date that the estimates file was loaded. Works as a relative date: will pick up the file loaded on that date, or earlier than but closest to that date.
-
Revision.
-
Delete enables you to remove a ratecard from the deal. Note that deleting the ratecard from a deal that has lines in the workspace will remove those lines from the workspace.
When you are done, click Save.
Guaranteed
When this is checked, it indicates that a deal is guaranteed on the network's or station's liability. This check box is used for reporting.
Equivalized
When this is checked, it indicates that a 15-second unit carries half the impressions of a 30-second unit. When this is unchecked, the 15-second unit carries the same number of impressions as a 30-second unit.
This check box is used for reporting.
Lost Reason
Plan Sub-Class
Pitch ID
Revenue Type
-
-
If you had selected Digital in the Platform field, AOS also displays the Digital panel. Digital deals will be supported in a future release.
-
After you have provided the required information, click Save in the button bar at the top of the window.
You can now enter additional deal information in the Conditions tab, as described in Specifying a Deal's Constraints and Separations.
Specifying Linear Details on the Header Tab (Video)
Specifying a Deal's Constraints and Separations
-
To enter information about constraints, click the Conditions tab and select Constraints.
The Constraints grid is displayed.
The grid has an Advertiser expanding header that lists all constraints that are defined at the advertiser level, and a Deal expanding header for all constraints defined only within the scope of this deal.
-
To disable one of the advertiser's constraints from this deal, click the Disable toggle in the grid's far left column.
-
To add a constraint by copying and editing an existing constraint, in the grid's far left column click the Duplicate icon in the row for that constraint. It opens a copy of the constraint: you can edit the copy. When you are done editing it, click Add to save the new constraint.
-
To add a constraint that you specify from scratch, click Add Constraint.
The Constraint panel opens above the Constraints grid. Constraints limit the circumstances under which a spot can be aired. Enter the requested constraint mode and constraint criteria as described in the following table.
Item Description Mode This is the type of constraint:
-
Include specifies that spots for this deal have to air in programming that satisfies this constraint.
-
Exclude specifies that spots for this deal can not air in programming that satisfies this constraint.
-
Exclusion Exception specifies that spots for this deal can air in programming that satisfies this constraint even if that programming would have been excluded by another constraint.
DOW The days of the week on which the deal's spots are constrained to air.
Start Time The start time of the daily period in which the deal's spots are constrained to air.
End Time
The end time of the daily period in which the deal's spots are constrained to air.
Program
The programs on which the deal's spots are constrained to air or to not air.
Episode The episodes within the selected programs on which the deal's spots are constrained to air or to not air.
Program Sales Genre The type of program on which the deal's spots are constrained to air or to not air.
Break The program breaks in which the deal's spots are constrained to air or to not air.
(This is currently disabled, and will be supported in a future release.)
Position The position (for example, the A spot or Z spot) within a program that the deal's spots are constrained to air or to not air.
(This is currently disabled, and will be supported in a future release.)
-
-
Enter information for a filter:
Item Description Channels The channels to which the constraint is applied.
Date Range The date range within which the constraint is applied.
-
If you want to add more filters, click Add and enter the information for each additional filter.
-
To add additional constraints, click Add Constraint in the button bar at the top of the window.
-
When you have finished specifying constraints, click Save in the button bar at the top of the window.
-
To enter information about separations, click the Conditions tab and select Separations.
-
The Separations grid is displayed.
The grid has an Advertiser expanding header that lists all separations that are defined at the advertiser level, a Product expanding header for all separations defined within the scope of a given product category, and a Deal expanding header for all separations defined within the scope of this deal.
-
To disable one of the advertiser's separations from this deal, click the Disable toggle in the grid's far left column.
-
To add a separation by copying and editing an existing separation, in the grid's far left column click the Duplicate icon in the row for that separation. It opens a copy of the separation: you can edit the copy. When you are done editing it, click Add to save the new separation.
-
Click Add Separation.
The Separation panel opens above the Separations grid. Enter the requested separation type and separation criteria as described in the following table.
Item Description Separation Type The type of separation:
-
Back to Back. Another spot that satisfies the separation conditions cannot be aired immediately preceding or following this spot.
-
Break. Another spot that satisfies the separation conditions cannot be aired in the same break.
-
Program. Another spot that satisfies the separation conditions cannot be aired in the same program.
-
Time Separation. Another spot that satisfies the separation conditions cannot be aired within the number of minutes of this spot that is specified by the Minutes field.
Minutes
This field is displayed only when Separation Type is set to Time Separation.
Self Indicates that the spot must also be separated from any spots from the same plan, or from the same advertiser, or from the same product category, whichever is the scope at which this separation is defined.
Primary Category The primary category of spot to be separated from the airing of this spot.
Secondary Category An optional subcategory of the primary category. If this is selected, it narrows the scope of the primary category to be separated from the airing of this spot.
Tertiary Category An optional subcategory of the secondary category. If this is selected, it narrows the scope of the secondary category to be separated from the airing of this spot.
Advertiser Indicates that the spot must be separated from any spots by the specified advertiser.
Brand Limits the advertiser separation to the specified brand.
-
-
Enter information for a filter, which specifies the conditions under which the separation should be applied.
Item Description Channel The channels on which the separation is to be applied.
DOW The day or days of the week during which the separation is to be applied.
Date Range
The date range for which the separation is to be applied.
Start Time
The time at which the separation should begin to be applied.
End Time
The time at which the separation should stop being applied.
Program
The program to which the separation should be applied.
Plan Class
This is for reporting only, and does not define the scope and target of the separation.
Unit Length
The length of spots to which the separation is to be applied, measured in seconds. If this is omitted, the separation will be applied to spots regardless of their length.
-
If you want to add more filters, click Add and enter the information for each additional filter.
-
To add additional separations, click Add Separation in the button bar at the top of the window.
-
When you have finished specifying constraints, click Save in the button bar at the top of the window.
You can now develop the deal by adding products, adjusting pricing, scheduling impressions, and more, in the Workflow tab.
Building Out the Deal in the Workspace Tab
The Workspace tab is where you build out the details of the units that will run as part of this deal:
-
Add a product by selecting Product Chooser from the Tools menu button.
The Product Chooser panel opens.
-
Specify the following attributes of the deal lines you want to create:
-
Commercial Type. (This functions as a product filter as well.)
-
Line Class.
-
Unit Length.
-
-
Click Apply. The Product List is now populated.
-
You can narrow the list of products by filtering it. This is optional.
AOS displays the default filters. You can use other filters by selecting them in the Filters drop-down list.
-
Select the products you want to add to the deal by selecting the associated checkbox.
-
If you want to limit the grid to only the products you have selected, to see their rows listed consecutively, click the View Selected Products toggle.
-
Click Add Selected Products.
A line is added to the deal for each product you selected.
-
You can change how the lines are grouped using the Group By field, and change how they are sorted within each group using the Sort By field.
-
You can edit the lines by clicking the kebab menu icon to the left of a line and selecting one of the following options:
-
Add Constraint, which enables you to add a line-level constraint.
-
Create Similar Line(s), which enables you to create a new line that starts out as a copy of the selected line. You can change the line's commercial type, unit length, and line class when you create it.
-
Remove Line(s), which removes the selected lines from the deal.
-
Edit Line(s), which enables you to edit the line's commercial type, line class, and unit length.
-
Remove Units, which removes all the units that had been specified for that line.
-
Copy Units, which allows you to copy the units of a product.
-
Paste Units, which allows you to paste units to a product.
-
Line(s) Prorate, which enables you to update in bulk the line's Weekly Rate, Weekly CPM, Weekly Impressions, and Weekly %RC, so that users do not need to change them week by week.
-
Notes, which enables you to add a descriptive note to that line.
-
-
You can switch between seeing the figures for each line by quarter (which enables you to add units), and seeing the figures totaled for the entire deal, by using the Quarter View and Plan Total tabs.
-
You can see how the demo-specific figures for each line change if the primary demographic is changed by using the Demographic drop-down list to the right of the Plan Total tab.
-
You can see the hidden lines by selecting the Hidden Lines check box.
-
You can change which columns are displayed in the quarter totals and deal totals sections of the grid by clicking the filter/funnel icon in the section's header and changing which columns are selected.
-
Many of the figures in the deal are being driven by the ratecard. If you wish to change the ratecard's effect, you can select Prorate from the Tools menu button, and reprice everything based on a percent of the ratecard, or on a new budget total, or on a new CPM.
-
If you think that the estimates associated with a product may have changed while you are working on the Workspace tab, you can update the figures in the grid by selecting Quick Refresh from the Tools menu button.
-
You can see which lines have constraints by clicking the Show Constraints (airplane) icon at the top right of the page. Lines with constraints will display a triangle in the top left corner of the line's summary cell.
-
You can see which lines have units whose rates vary from week to week by clicking the Show Different Rate ($) icon at the top right of the page.
-
You can see which weeks in which lines have linked units by clicking the Show Links icon at the top right of the page. The ovals representing weeks with linked units will display a triangle in the top left corner.
-
You can see which weeks in which lines have a note by clicking the Show Note icon at the top right of the page. The ovals representing weeks with notes will display a triangle in the top left corner.
-
In a quarter tab (for example, 2021-Q4) there are columns for each week in the quarter. This enables you to specify, for each deal line, how many units are proposed for each week. Select the oval for a given week, and type the number of units that will run for that line in that week.
-
Hovering your mouse pointer over an oval shows the available inventory for that line for that week, with the total inventory for that time displayed at the top, and the inventory available for that line's category displayed below.
You can refresh the inventory figures to reflect the latest state of inventory by clicking Category Avails above the grid.
-
When you select an oval, its detail panel is displayed above the tab, showing the following information for that line's units running that week:
-
Weekly rate (Unit $$). This is the rate a new unit in that week will inherit, and defaults to the ratecard value. You can edit this.
-
Impressions per unit (Unit IMPS). This defaults to the ratecard value, and can be changed only by a user who has been assigned the appropriate permission.
-
CPM. You can edit this.
-
Cost per GRP (GRP).
-
Percentage of the ratecard ($RC) price being charged for this week's units. You can edit this.
-
-
When you hover your mouse pointer above the panel's kebab menu icon, AOS displays a menu with the following options:
-
Unit View, which opens a panel that separately lists each unit for that line for that week. You can edit figures for an individual unit. You can also link individual units together in a relationship, such as a book-end relationship.
-
Notes, which enables you to add a note to that week for that line.
-
Remove Units, which clears the units for that week for that line.
-
-
If there are additional fees that need to be accounted for in the deal, select Deal Additional Fees from the Tools menu button,
This displays the Deal Additional Fees panel. Provide the requested information, click Add Additional Fee if you need to add more than one fee, and click Save when you are done.
-
When you have completed your work on the Workspace tab, click Save at the top left of the page.
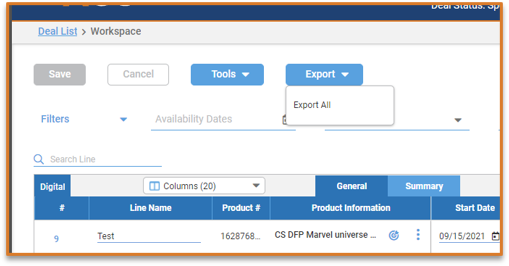
Deal Workspace Export
To export the Workspace information, select the Export All option under the Export button.
The export output file will contain deal-related information, Advertiser and Buying Agency details, Account Executive, and the Workspace lines that have the Can Export flag set to True.
If notifications are configured at the System Configuration level and your emails notifications for export are set, when the export process is complete, you will also receive an email notification that allows you to download the output file directly.
Specifying Budget Information
You can specify budget dollars and Gross CPM, and calculate the corresponding impressions (000), for cross-platform Linear and Digital deals.
To do so, click the Goals tab and select Budget. The Budget grid is displayed:
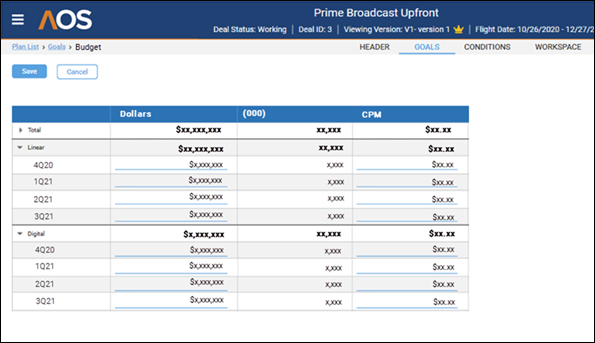
The grid has the following columns:
-
blank heading (for Totals, Linear, or Digital with Quarterly breakouts)
-
Dollars
-
000 (impressions)
-
Gross CPM
Adjusting Impressions, Gross CPM, or Budget to Match a Guarantee
There are times when a deal's careful calculations on the Workspace tab do not exactly match a commitment, that is to say a guarantee, that you made to the advertiser. For example, you may have guaranteed an advertiser that a line's Gross CPM would be $35.00, but the line's calculated Gross CPM comes in at $35.17. You could use the Guarantees grid on the Goals tab to revise that Gross CPM to $35.00 so that it matches what you had committed to.
Adjustments are all based on the equation Budget ($$) = Gorss CPM * Impressions (Imps). You decide which of those three values you want to hold constant (for example, Budget), and then change the value you have guaranteed to the advertiser (in this example, Gross CPM). When you change it, AOS automatically adjusts the third value (in this example, Impressions).
The Guarantees grid has three sections:
-
Calculated. These are the deal's calculated figures from the Workspace tab.
-
Guaranteed. These start out being identical to the calculated figures, and you adjust them as necessary to account for commitments or guarantees you made to the advertiser. The adjusted figures in this section will be used by your stewardship system.
-
Archive.These are the figures that were in effect when the deal went to Hold/Order status. The figures are archived here so that you have a record of what the deal originally looked like, before changes were made over the course of the deal, such as money shifting to different quarters, options being taken, etc.
The grid displays each line of the deal, and for each line it displays each quarter in which the line runs.
To adjust amounts that don't match a guarantee:
-
Click the Goals tab and select Guarantees.
The Guarantees grid is displayed.
-
Above the grid, in the Constant section, select the value that you want to hold constant:
-
Gross $$ (the budget)
-
Gorss CPM
-
Imps (impressions)
In the grid, in the Guaranteed section, the column that you selected will be protected from editing, and you will be able to edit the other two columns.
-
-
For each value that you want to adjust for a quarter for a line, edit that value.
AOS will automatically update the other editable value for that quarter for that line, using the equation Budget ($$) = Gross CPM * Impressions. AOS will also update the totals for that line of the deal, and the totals for the entire deal (at the top of the grid).
-
If at any point you want to reset the values in the grid's Guaranteed section to their original values from the grid's Calculated section, click Update above the grid.
-
Once you have adjusted all values that need to be adjusted, click Save to save your work.
Specifying the Deal's Options
Specify whether the deal includes any options that the advertiser can take during the course of the deal. If the deal does include options, specify what they are.
-
Click the Goals tab and select Options.
The Options grid is displayed. The grid displays each line of the deal, and for each line it displays each quarter in which the line runs.
The grid displays columns showing the amount of money subject to optioning, the amount of that which the advertiser can option, and until what date the advertiser can exercise that option, totaled for each line and broken out by quarter.
-
If the deal has no options, select the Plan Has No Options check box at the top right of the page, and then skip to step 4 below.
-
For each quarter that can be optioned, specify:
-
The percentage that is optionable, in the Optionable % column.
This will automatically update that absolute amount of money that is optionable for that line (in the Optionable $$ column), the total for that line of the deal (in the Optionable % column), and the total for the entire deal (also in the Optionable % column, at the top of the grid).
-
By how many days before the end of the quarter the advertiser can exercise their option, in the Days in Advance column.
This will automatically update the Option by Date column for that line.
- Once you have entered all the information, click Save to save your work.
Change Workflow Status
Once the deal is ready for the next step, go to the Header tab, click Change Status at the top of the page, and move the deal from Speculative to Working by selecting Submit to Working.